
See the full article published in Amateur Photographer July 2021:
My Silchester Star Trails took a lot of planning and waiting for the perfect clear, moon free night to take the 162 photos, some of which I light painted (the paths and church windows) by using a Lume Cube. The photos were then stacked a couple of days later to create the final image.
I first started by selecting a location which I thought might create a nice image, at the time Christmas was coming up… my thought was to create an image of the the church spire with Polaris aligned as close as possible to the spire and then capture the rotating star trails with as much colour as possible.
I walk around Silchester nearly every day with my dog Bob and had walked through the churchyard many times. The first thing I needed to know was the location of Polaris in relation to the church spire. Luckily, these days you can find apps on your phone to help with almost anything. The one I use on my iPhone is called “Night Sky“
With “Night Sky” I can enter Polaris in the search bar, select Polaris in the results and then select “Directions always above horizon”.. following that I just need to move the phone and follow the arrow on the screen until I see where Polaris is in the sky.. This will pretty much be the same position day or night at any point during the year.. almost.. but good enough to help determine where to position the camera..
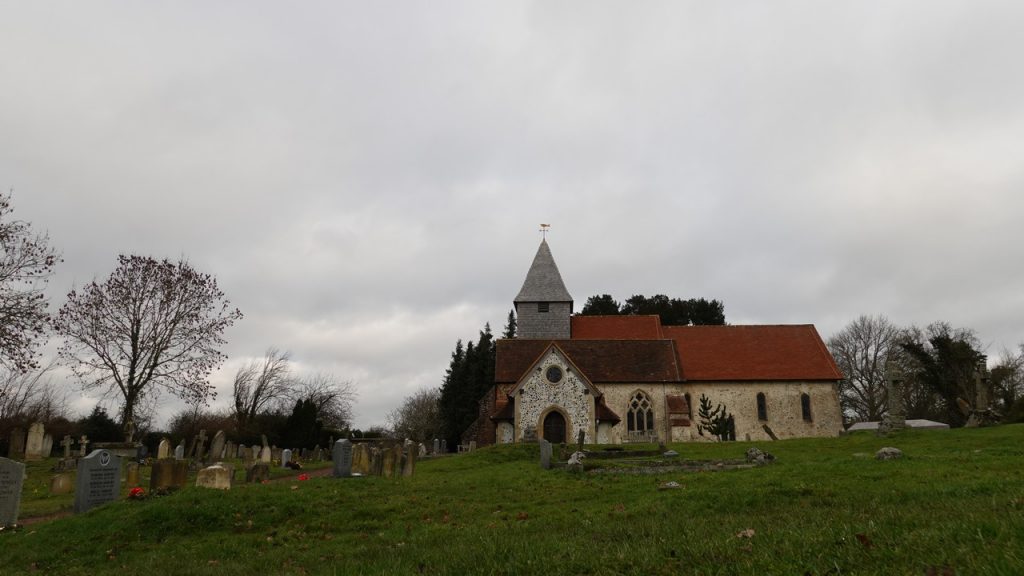
Here’s my daytime location shot which helped me work out where to position my tripod in the dark.
Another key app I use is called “Clear Outside“. This helps me see in advance which night and times the sky might be clear enough to venture out.
The other thing I need to know is how bright the Moon might be.. For Star Trails the best time is when there’s a New Moon .. Trying to avoid a full or bright Moon. For this I use “Photopills” which is one of the best free apps I’ve found for Astrophotography as it also includes a Virtual Reality view for any given date, which is especially useful if you ever want to do Milky Way, Astro, Moon or Sun photography.
The “Photopills YouTube” Channel is also one of the best I’ve found as it has some really great tutorials.
Taking The Pictures
Equipment used:
- Benro Travel Angel 2 Four Section Aluminium Twist Lock Tripod
- Camera, Sony ILCE-7M3 Full Frame DSLR
- Lens, Samyang 2.8/14mm Ultra Wide Angle, Manual Focus
- Lume Cube 2.0
- Neewer Vertical Battery Grip for Sony A7MIII with 2.4 G Wireless Remote Control
- Head Torch with White and Red Light Modes
- Small LED Torch
Camera Settings Used:
- Exposure Program, Manual Mode
- ISO Speed, ISO 1600
- F-Stop, F2.8
- Focus, Infinity
- Camera Exposure, Bulb Mode
- 2.4 G Wireless Remote Control Settings
- Delay before 1st Photo, 2 sec
- Exposure Time, 26 seconds/photo
- Interval between photo’s, 2 seconds
- Number of Photo’s, 162
Once in position, with the camera securely mounted on the tripod, the next step was to check the orientation and alignment to make sure the scene was showing what I wanted in the frame. With a really dark night and no moonlight, I find the best way to do this is light the ground with a narrow beam of my LED torch light, I can then see in the camera’s display what’s in or out of the frame and make adjustments until it shows what I want.
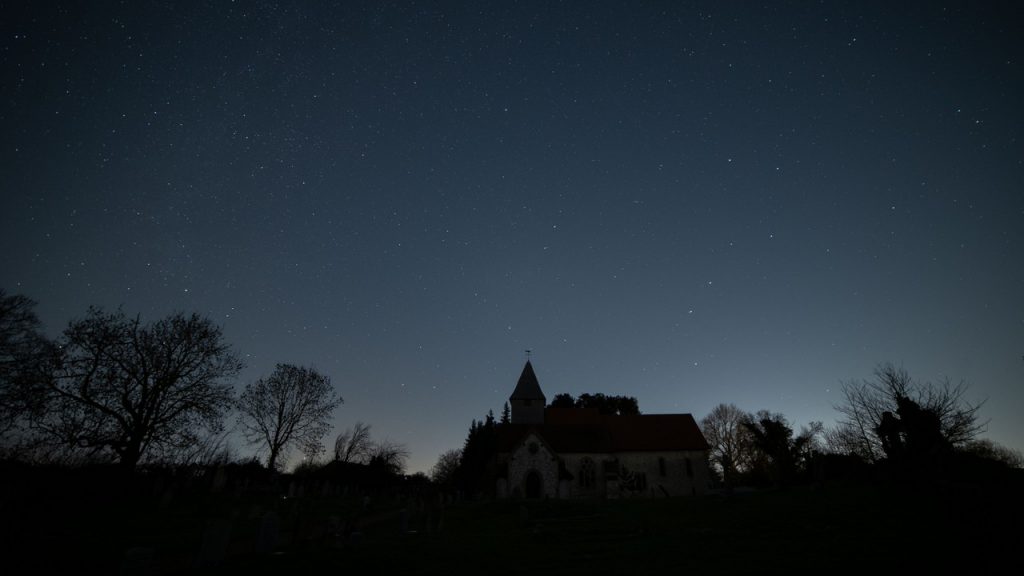
With the camera mounted and aligned correctly, I then check all the settings to make sure they’re set correctly.. I might do a couple of test shots using different ISO settings but generally found ISO-1600 works well as I can make adjustments in Lightroom/Photoshop in the post-processing.
The image below shows my first image using ISO-1600 without any lighting as the churchyard is in a country location and pretty dark. ISO-1600 makes it look slightly light without losing the stars.
I could have taken all 162 photos like this but, after stacking, they would just end up with a dark outline of the church and the Star Trails above.
Once the camera was automatically taking the pictures at 26 seconds / photo, I then walked up the path with my Lume Cube 2.0 slightly dimmed and in front of me, being careful not to shine the light directly at the camera.
The image below shows the result for one of the photos
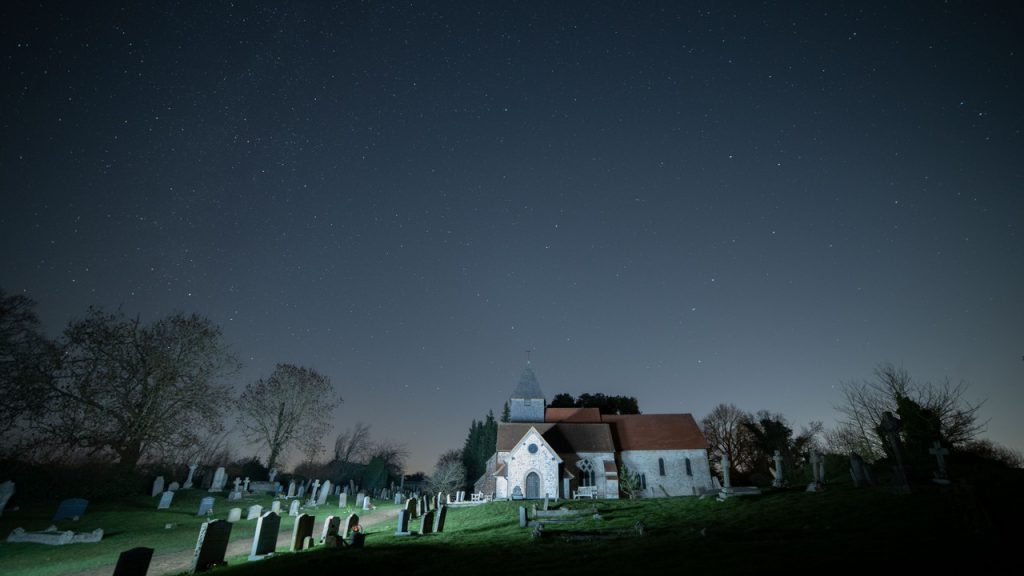
This process was repeated a number of times to give light to the different areas I thought might look nice in the final image.
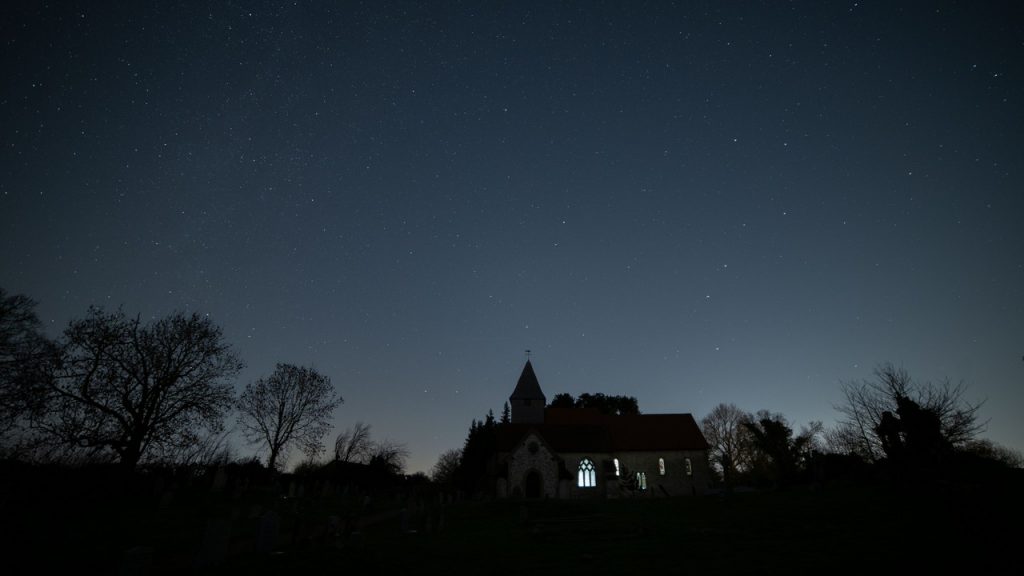
The photo below shows how I lit the church windows by holding the Lume Cube on max light at various windows on the opposite side of the church.
Post-Processing
Once home I transferred all the images to my PC and backed them up to another drive and to my Network Area Storage (NAS) which also runs a scheduled backup to a second NAS drive during the night..
Post processing is where we can combine the images and remove any objects or lights we don’t want in the final image, as we often get Satellites, plane trails, car lights, other peoples torches etc.. Rather than explain how to do this there is an excellent tutorial on YouTube called “Star Trails – Photoshop Tutorial” by “Peter Zelinka” which you can watch using the YouTube link below.
NOTE: There are alternatives to using Photoshop but there is less control over the ability to mask out unwanted lights, trails..
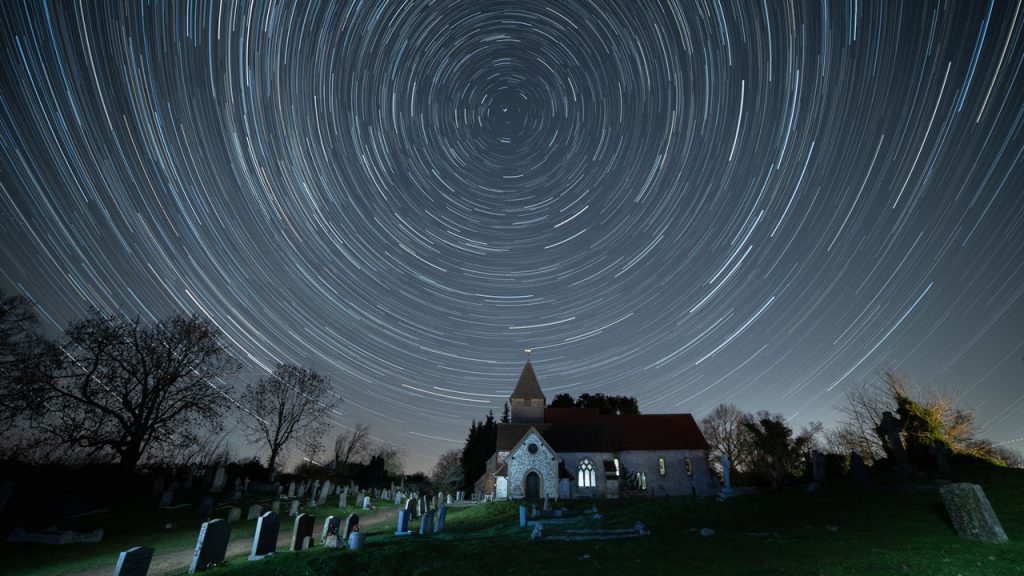
My Final Star Trail Image
Having watched the Photoshop tutorial numerous times I hid all the layers in Photoshop and then went through them one at a time giving them names of what they showed, if they were anything other than just the church and Stars.
If the layer showed any kind of light I’d give it an appropriate title.. ie. “Church Path Lit 1″, Church Path Lit 2”, “Church Windows Lit”, “Lights from Passing Car” etc.. That made it much easier to enable all the normal layers, and then enable the layers with light one at a time, or in combinations, to see how they looked when they were or weren’t visible.
Once I had the combination I liked I then hid all the layers. For the unused layers with light, I masked the lit areas I didn’t want in the final image to make sure the layer could be made visible, so the stars would still be part of the final Star Trail as without them, I would have little gaps between the Star Trails.
Finally I made all the layers visible to get the final image shown above and below..
The “World Around US” Is a Wonderful Place, Make the Most of It, Look After It, and Always Remember… ”Look UP” as well as Around.. The wonderful things you see and lovely nature around US won’t be there for our younger generations if we don’t… Enjoy it while it lasts, make sure generations to come have the same opportunities as OUR’s have done … “AFTER” we’ve gone make sure those wonderful things are still there… Duncan…